The Schedule helper is one entity, not a device command
The built-in Schedule integration creates a weekly schedule entity from time blocks with a start and an end. The entity is active while a block is running and inactive outside it. Its output is that state plus the attributes the active block adds, such as next_event and any key_1, key_2 values from Additional data. Nothing in the helper switches a light, starts a pump or calls a service by itself. Your automation reads the entity and decides what happens next.
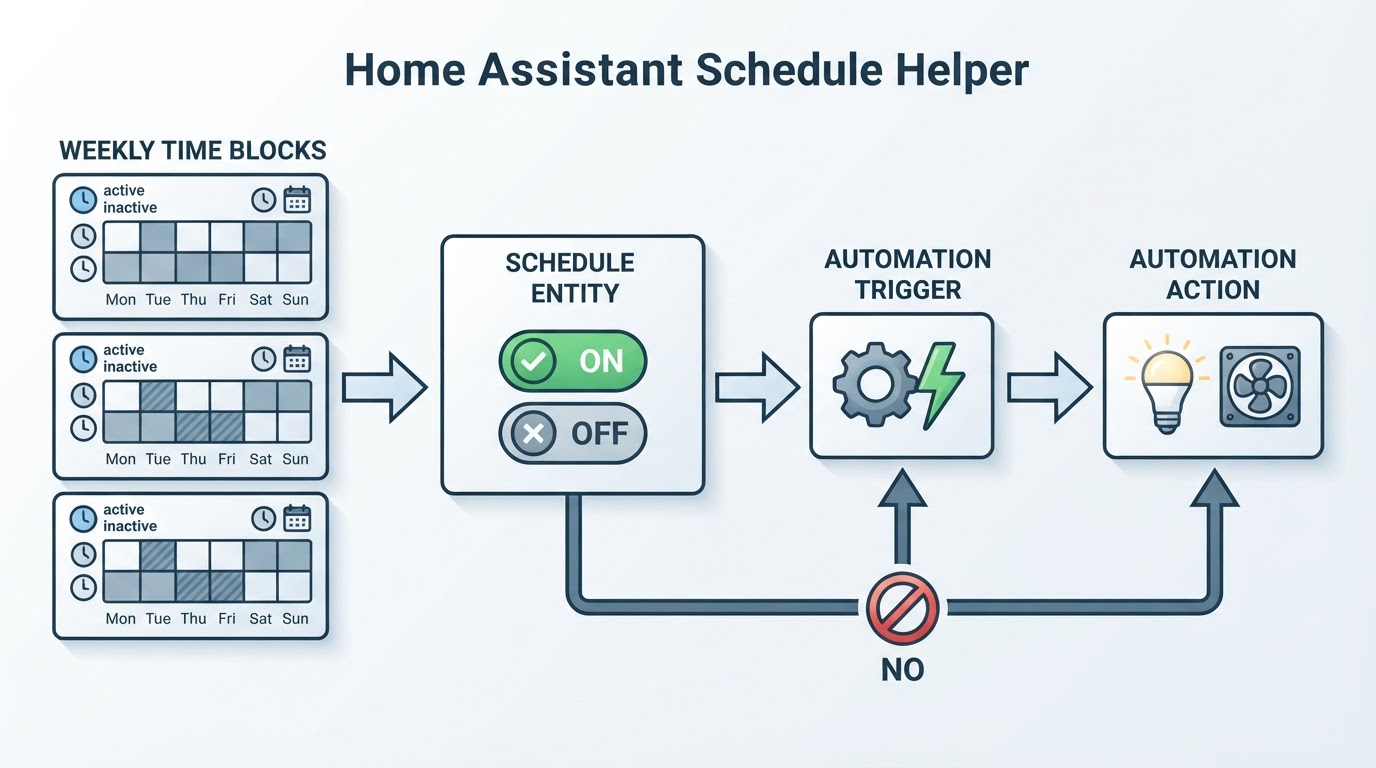
Three documented rules decide how the entity behaves, and they decide whether your automation fires when you expect:
- Start is inclusive, end is exclusive. A block from 09:00 to 12:00 is active at 09:00:00 and already inactive at 12:00:00.
- Blocks may touch but may not overlap. One block ending at 12:00 and the next starting at 12:00 is a valid configuration. Home Assistant rejects overlapping blocks on the same day.
- A block cannot cross midnight. An overnight window is built as two touching blocks on consecutive days, with a different weekday label on each half.
Anything you add to a block's Additional data becomes an entity attribute (key_1, key_2, and so on) while that block is active. That is a practical way to carry a per-block brightness or setpoint into the automation without creating a second helper. The attributes belong to the block, so touching blocks replace them at the boundary.
The built-in helper is also a different thing from a community scheduler card or a third-party scheduling integration. Those tools bring their own cards, service calls and edge behavior, so instructions written for one do not transfer to the other. Everything below describes the built-in Schedule helper entity only.
Create the helper and draw the week
- Open Settings > Devices & services and select the Helpers tab.
- Select Create helper, then Schedule.
- Give it a name, and an icon if you want one. The name you type usually becomes part of the entity ID, such as
schedule.garden_watering. - Press and drag across each weekday to draw a block. Blocks can meet end to end; Home Assistant only rejects blocks that overlap on the same day.
- Select a block to adjust its start and end times and to add optional Additional data.
- Save, then copy the exact entity ID from the Helpers list. An automation must target that string, not the friendly name.
If a block appears to start at the wrong hour, check the time zone under Settings > System > Home information before you redraw anything. Moving block edges will not correct an offset that comes from the clock setting.
Make an automation respond to the schedule
There are two practical ways to turn the helper into action, and the one you choose decides whether a second block that starts while the schedule is already on gets its own automation run.
A state trigger that fires when the schedule becomes active
A plain state trigger is the simplest option when all you need is "the schedule just turned on". This is a complete automation in YAML — the shape used by the Edit in YAML screen of an individual automation, which starts at alias: and has triggers: and actions: but no automation: wrapper:
alias: "Hallway evening schedule on"
description: "Notify when the hallway schedule becomes active."
triggers:
  - trigger: state
    entity_id: schedule.evening_hallway
    from: "off"
    to: "on"
actions:
  - action: persistent_notification.create
    data:
      title: "Evening schedule on"
      message: "The hallway schedule turned on."
Paste that block into the automation's Edit in YAML view as it is. The placeholder schedule.evening_hallway and the notification are yours to replace; persistent_notification.create is harmless and leaves a dismissible message instead of touching a device.
Placement is where copy-paste goes wrong. configuration.yaml needs the same automation as a list item under the existing automation: key: the key on its own line, then the block starting with - alias:. If your configuration already has an automation: key, add the item to that list rather than writing a second automation: key. And a snippet that begins with automation: — the whole list form — cannot be pasted unchanged into the single-automation editor, because the editor already represents one automation and does not accept the top-level key.
A state trigger fires on every off-to-on transition, so it covers the first block of a day and any later block that starts after the schedule has been inactive. It does not fire at the boundary between two touching blocks, because the state never leaves on.
A block-start trigger for every block, including touching ones
The Schedule integration also provides a schedule.block_started trigger, which fires when a block starts whether or not the entity was already on. That is the trigger that notices the second block when it touches the first. Its current fields, UI steps and examples live on the Schedule block started trigger page, which is the reference to follow for your version; this guide does not restate the option list, because it can change between releases. The matching schedule.block_ended trigger exists for the other edge, and it does not fire at a touching boundary for the same reason a state trigger does not: the schedule never became inactive.
In the visual editor the trigger is added under When by targeting the schedule entity and choosing Schedule block started. Keep the notification action as a placeholder while you confirm which trigger you need.
Use the helper as a condition instead
The helper also works as a gate rather than a trigger. The schedule.is_on and schedule.is_off conditions test whether one or more targeted blocks are currently active, which is useful when a time trigger, a button or a door sensor should only run inside the schedule window. That is a different question from "did a block just start", and it is the safer choice when the automation already has its own trigger.
Touching blocks: the state never flips
If a morning block runs 07:00 to 10:00 and the next runs 10:00 to 12:00 on the same day, the two blocks touch. The documented behavior at that boundary is explicit: the schedule's state stays on, the block attributes are replaced with the new block's values, and an automation that triggers on the state changing to off does not fire. A schedule.block_started trigger does fire for the new block, while schedule.block_ended does not, because the schedule never became inactive.
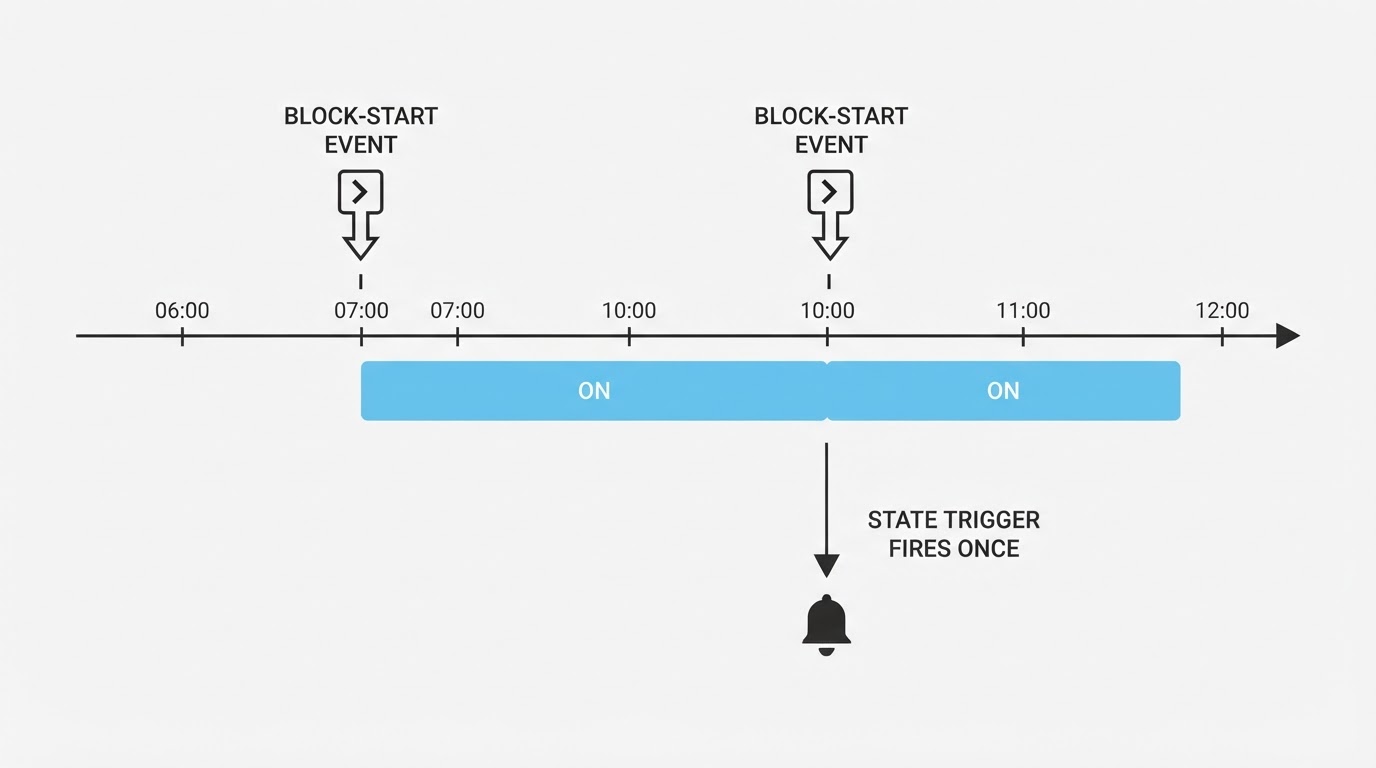
This is the first thing to check when an automation fires at the start of one block but not the next. Nothing is broken: the state trigger is doing its job, and the schedule simply never returned to off, so there was no off-to-on transition to react to. No gap is required between blocks. Touching is a valid, documented configuration, and the fix is to pick a trigger that matches the boundary you care about.
What you want the automation to notice | Trigger or condition to use |
|---|---|
The schedule becoming active after an inactive stretch | State trigger, |
The start of every block, including a block touching the previous one |
|
The schedule becoming inactive at the end of the last block | State trigger, |
Whether a block is active right now |
|
Overnight hours: two blocks, split at midnight
A single block cannot cross midnight, so an overnight window is two blocks on consecutive days. A Friday-night window from 22:00 to 05:00 is 22:00 to 24:00 on Friday plus 00:00 to 05:00 on Saturday. The weekday labels differ because the calendar day changes at midnight; picking Friday for both halves would give you Friday's early morning and Friday's late evening, not the night that runs into Saturday. Select the actual next day for the after-midnight block.
Two consequences follow. First, the pair is one continuous window, so the entity stays on from 22:00 Friday until 05:00 Saturday and never returns to off at midnight. Second, that continuity does not suppress block events: a state trigger runs once, at 22:00, while schedule.block_started fires twice, once for each block. On-state continuity and the number of block-start events are separate things, and a weeknight pattern needs the after-midnight block created for each following day you want covered.
If the automation needs hour-based gates on top of the blocks, the guide to time conditions across midnight explains how after and before behave at the window edges, including which weekday applies after midnight.
When the automation still does nothing
Symptom | First thing to check |
|---|---|
No run at any block edge | The trigger target's entity ID matches the helper exactly; a renamed helper keeps its old ID |
The first block fires, later blocks do not | A state off-to-on trigger is watching touching blocks |
Two runs at a single boundary | Both a state trigger and |
Runs at 22:00 but not at 00:00 | The trigger is a state change, not a block start |
Nothing happens overnight | The after-midnight block is missing or sits on the wrong weekday |
The notification appears only when you run the automation by hand | A manual run executes actions and never evaluates triggers |
That last row matters when you are debugging. Run actions from the automation's menu runs the action list with no trigger involved, so a notification appearing there proves only that the action works. It says nothing about whether a schedule boundary will start the automation.
Run traces answer the rest quickly. A trace records the trigger that started it, which conditions passed and how it ended, and the guide to delays and automation run traces shows how to read one, including the modes that quietly cancel or drop a run.
A checklist to confirm the setup
These are proposed checks for your own installation, not results from a test bench, and passing them is not a guarantee that every boundary will fire in every setup:
- Open Developer tools > States, filter for your
schedule.entity, and confirm it readsoninside a block andoffoutside it. - Add a temporary block two or three minutes ahead and leave the automation saved. When the block starts, open the automation's traces and confirm a run exists and names the trigger you chose. Wait for the scheduled boundary rather than pressing Run actions, which skips the trigger entirely.
- Add a second block that touches the first. At the boundary, check two things: the state history shows no
offbetween the blocks, and aschedule.block_startedautomation records a new run. - Build the overnight pair — 22:00 to 24:00 on one day plus 00:00 to 05:00 on the next — and compare the run count with the trigger type: two runs from
schedule.block_started, one from a state trigger. - Delete the temporary blocks and restore the real times once the checks pass.
The setup is finished when you can name the trigger your automation needs and you have one trace from a real scheduled block start that shows the action running. Keep the placeholder notification until then, so a mistake costs you a dismissal rather than a device action.